Introduction
Can you create your own tools using AI without any programming background? Meituan’s NoCode AI Agent makes it accessible to turn your ideas into reality. From an AA accounting tool to an English learning mini-program, you can complete the entire process from concept to launch in just three steps. This article reveals how to use precise prompts and multi-model testing to help you bridge the technical gap and experience the magic of zero-code development.

After researching dozens of AI applications from home and abroad and updating 20 articles last year, I suddenly lost interest in AI. Only during the Spring Festival, when MiniMax’s stock price hit 1000 HKD, did I feel a stir inside. Most of the time, I found myself staring at the drafts, losing the desire to create. Ultimately, it was a desire for control; once I glimpsed how others created products, I wanted to try it myself. Unfortunately, my skills were limited to saying things like “hello world” and “PHP is the best language in the world.”
Fortunately, AI technology is evolving rapidly. Last year, I was troubled by how to become a paid member of Claude, but this year, Vibe Coding has dispelled the gloom. Just send commands to AI, such as: “I want to create a matching game” or “Help me create an English learning mini-program for my 3-year-old niece,” and within a minute, it can generate code. Click “Run” to experience the product. Aside from the Song Dynasty over a thousand years ago, it seems that we humanities students are experiencing a brief spring once again.
If you, like me, have no programming background but are eager to turn your ideas into fun applications that add color to life, you must try Meituan’s NoCode AI Agent! I want to clarify that this is not an advertisement; I have no financial ties to Meituan other than ordering takeout (and being stung by the Hang Seng Technology ETF).
Next, I will use the small tool I created as an example, combined with the workflow, operational bottlenecks, and solutions I experienced during Vibe Coding, to help you organize your thoughts. Without further ado, let me teach you how to use AI to create tools in three major steps.
Step 1: Organize Your Idea, Plan Basic Functions, and Sketch a Simple Product Prototype
I created an “AA Accounting Tool” inspired by outings with friends, where the amount to be paid and the number of people sharing the bill often varies. To reduce the hassle of multiple transfers and since there was no existing app that fully met my needs, I decided to develop it myself.
For those familiar with Excel, “multi-person AA accounting” is just a matter of a mathematical formula. However, considering the outdoor scenario, not everyone carries a computer; moreover, apps and mini-programs are too formal. I don’t need to attract new users or consider retention. Thus, I chose to create it as an H5 page, accessible via a link on both computers and mobile devices.
Returning to the product concept, I initially planned for version 1.0 to meet three requirements:
- Users can manually add bills when the number of payments and participants is small.
- There are template bills that one person summarizes and uploads for calculation.
- The bill displays the AA results intuitively without requiring multiple transfers.
Since my thoughts often change while writing, after clarifying the basic product functions, I usually sketch the product prototype by hand, as a paper version helps me quickly adjust the layout.
Only when the prototype is finalized do I transfer it to Axure or Figma to create an electronic version for documentation, while also writing a detailed functional specification document that notes the interaction details of the front and back-end pages, as well as data storage conditions.
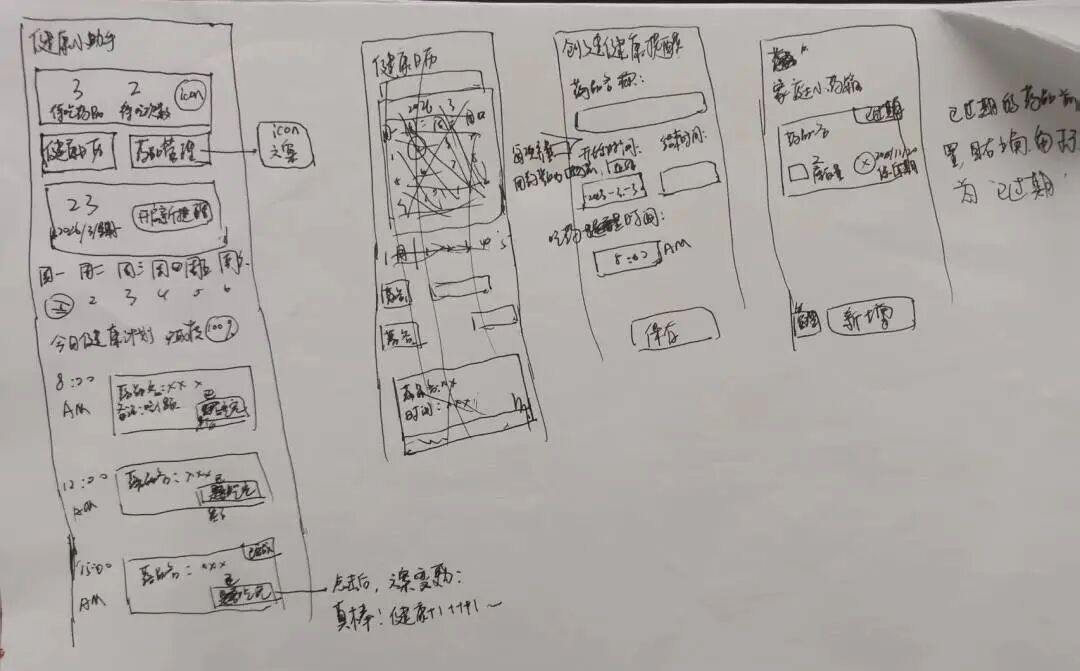
Note: The image above is not the tool created this time, but just a practice sketch.
Before starting Vibe Coding, there are a few details to confirm. Here are some points for you to consider in advance:
- What “problems” can the product you want to create with AI solve?
- What form will the product take: app, H5, or mini-program?
- What basic functions are needed, and can you describe how to use them specifically?
- What will the page look like? Can you draw a simple product prototype?
Step 2: Write Prompts, Test with AI Assistants, and Continuously Refine Based on Output
To do a good job, one must first sharpen their tools. Once you clarify the product planning in Step 1, you can write more precise prompts. The clearer the prompts, the more accurately the AI can generate UI designs that reflect your product prototype, even without reference images.
I want to create an AA Accounting Tool
- The page style is the size of an app.
- The UI design style is like an electronic receipt.
- The main title is: AA Accounting Assistant, with a calculator-style icon on the left. Centered display, font size 20.
- The subtitle is: Input payment information, and it will tell you who to transfer to in 1 second. No icon needed. Centered display, font size 13.
- Only modules 1, 2, 3, and 4 have card borders; the main title and subtitle do not need borders.
- All icons are vector graphics, with a unified style and color, hex code #006FFA.
This AA Accounting Tool has 4 modules, with specific function descriptions as follows:
Module 1,
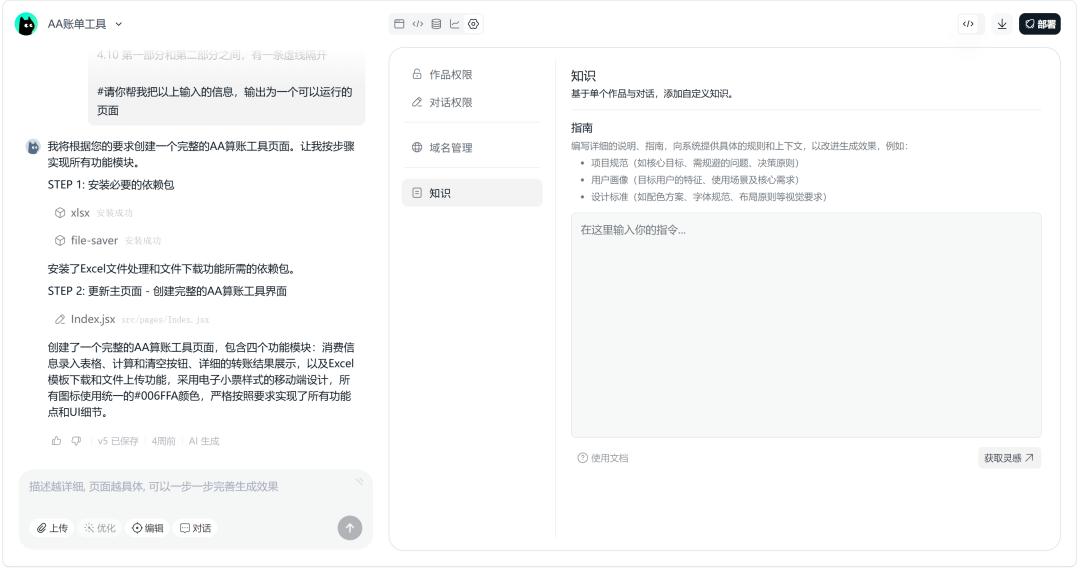
1.1 The title is: Input Consumption Information, with a note-style icon on the left. Font size 12. 1.2 Display the input information in a table format. 1.3 Users can input consumption information, with field titles displayed as: Number of Payments, Payer, Amount, AA Participants. Field titles are centered and displayed in one line without wrapping. 1.4 The number of payments accumulates based on user input, formatted as “x” and so on. The number of payments is displayed in one line without wrapping. When users first enter the tool, the system defaults to displaying the first payment, which cannot be deleted. When users click the “x” button, the system automatically calculates the bill based on current data. 1.5 The prompt text for the payer field is “Name,” for the amount field is “0.00,” and for the AA participants is “separated by commas.” Do not let the content input box overflow. 1.6 Each column of consumption information has a “×” icon next to it. Clicking this icon deletes the entire row of information, but the first payment (first row) cannot be deleted. It should not be named “operation.” 1.7 At the bottom, there is a button labeled “Add a New Expense.” When users click it, they can add a new blank row of consumption information. The UI style for the “Add a New Expense” button is an icon with a plus sign, with a dashed border.
……
Module 4,
4.1 The title is: Upload Consumption Attachments, no icon needed. Font size 12. 4.2 Presented as two parts. 4.3 The first part has a button with the text “Download Template.” No icon needed. Above the button, the prompt text is: Download the import template to easily upload bills. 4.4 When users click the “Download Template” button, they receive an Excel file with the fields “Payer,” “Amount,” and “AA Participants,” without needing to fill in the number of payments, which the system generates automatically. 4.5 If the user successfully downloads, a small text will appear in this part stating, “You have successfully downloaded the template,” which will disappear after 10 seconds. 4.6 The template provides a reference format for input. 4.7 The second part has a button with the text “Choose File.” No icon needed. Above the button, the prompt text is: Please upload the completed bill. When users click the “Choose File” button, it opens the user’s desktop to upload a file with the above fields. 4.8 Supports xlsx format files. The specific information will be automatically entered into # Module 1; once the file information is completed, the bill will be automatically calculated. 4.9 If the user successfully uploads, a small text will appear in this part stating, “You have successfully imported xx expenses,” with the data sourced from the successfully imported consumption information, which will disappear after 10 seconds. 4.10 There is a dashed line separating the first and second parts.
Please help me output the above input information as a runnable page.
Using my “AA Accounting Tool” as an example, I will share some prompts. Due to space limitations, I cannot show everything, but the methodology is similar. In summary, my logic for writing prompts is:
- Use symbols like “#” and “–”, numbers, and blank lines to organize the prompt content.
- The first part is to establish the product tone, describing the form, layout, and visual style.
- The second part summarizes the overall functional modules of the product.
- The remaining part details the functional modules, including special UI, interaction logic, and prompt information.
- Finally, instruct the AI to output “a runnable page” based on all the information.
However, since NoCode provides each user with a limited number of AI interactions, to avoid wasting opportunities before finalizing your prompts, you should improve their accuracy.
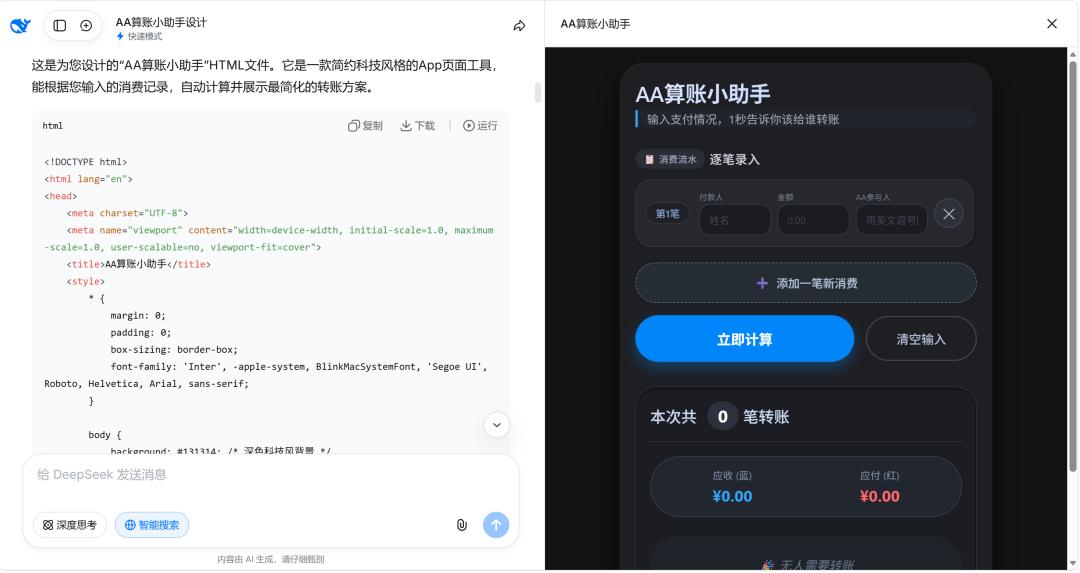
My solution is to upload the written prompts to other AI assistants, allowing them to write code as needed. By clicking the “Run” button, you can reference the product that AI generates. The benefit of this approach is that AI will supplement details you may have overlooked and allow you to test the product’s functionality early, optimizing your prompts in a timely manner.
As of the time I wrote this article, my subjective experience ranking of AI programming capabilities among major models is: Claude > deepseek > Doubao > Qianwen > Yuanbao. My personal experience is:
- Qianwen’s code execution is poor, often crashing during calculations.
- Doubao’s UI is average; if not emphasized beforehand, the generated page may have text overflow and needs improvement in adaptability, but its calculation ability is decent.
- Deepseek can supplement product requirements and has a more beautiful UI.
- Yuanbao’s understanding of requirements is lacking; after multiple rounds of requests, it struggles to maintain context and output effective code.
Each AI assistant has its strengths. After writing your prompts, at least upload them to two AI assistants to check for logical flaws in the product. I recommend deepseek and Doubao first. As for why I don’t comment on Claude, it’s everyone’s responsibility to support domestic alternatives (laugh).
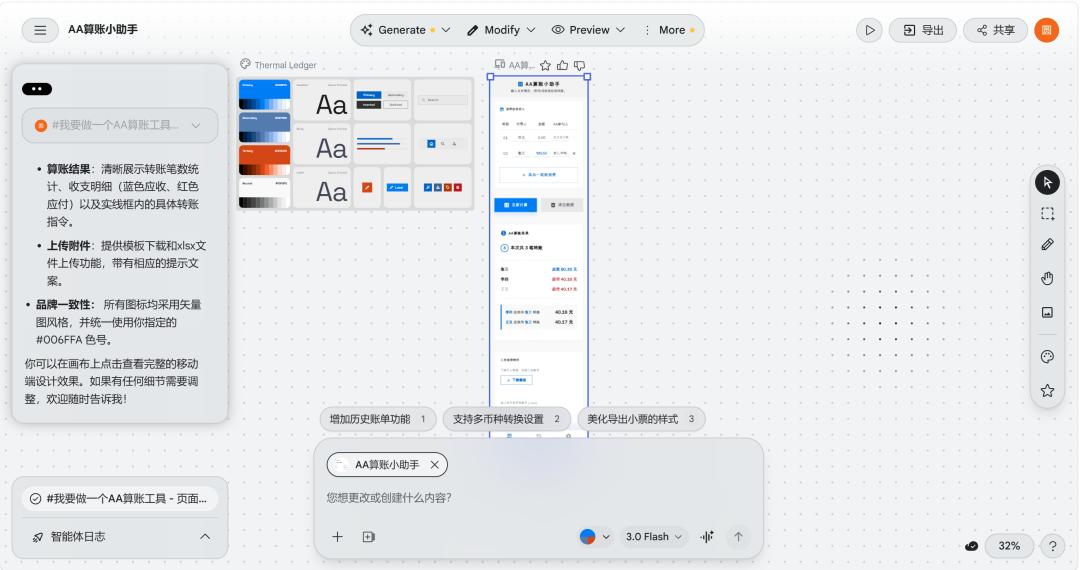
Step 3: Input Finalized Prompts into NoCode, Select a Satisfactory UI Style, Test, and Deploy
Congratulations on completing the first two steps! Unlike PDD’s cutting a knife, which always leaves you 0.01% short of cashing out, you are now just 5% away from using AI to create a tool.
Next, you just need to register for a NoCode account, send the finalized prompts, and wait for AI’s feedback.
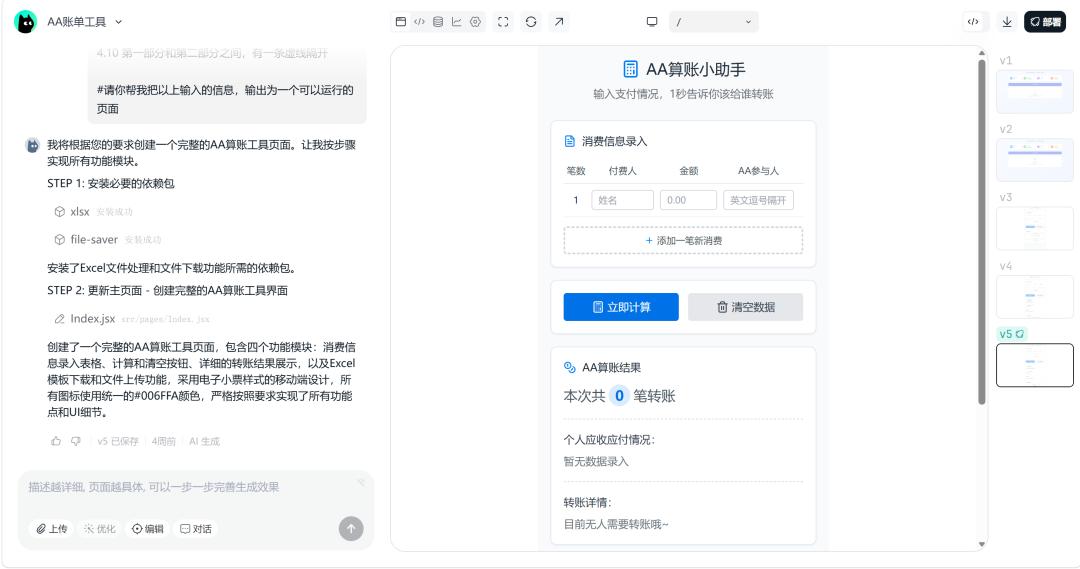
As mentioned above, each AI assistant has its strengths. Even if you have made thorough preparations in Step 2, the page generated by NoCode may not satisfy you. To expedite the process, you might choose to take screenshots of high-quality UI from design websites, send them to AI, and instruct it to generate a new page based on the reference images.
Without delving into deep topics like AI ethics and compliance, this practice of “feeding AI with admired works” carries copyright risks, especially with copyrighted works. If future commercialization is involved, it’s advisable to approach this cautiously.
Before going live, “no bugs” is my basic requirement for a product. If you lack technical knowledge and cannot produce a logically sound “Product Acceptance Test Cases,” I recommend a “clumsy” yet effective method: imagine yourself as a first-time user of the product, eager to “pick faults” and provide feedback. Test every page and button, and combine the functional points organized in Step 1 to meticulously inspect your work. Report any issues to NoCode for bug fixes, and repeat the checks until you can find no faults.
After completing all steps, select a version you are satisfied with, click the “Deploy” button in the upper right corner, and you can create a link for others to access.
To commemorate this important moment, you can customize the tool’s domain name within a limited range according to your preferences.
In addition, NoCode has two relatively “advanced” functional modules to help you enhance product experience: the [Data Analysis] module and the [Permissions, Domain Management, and Knowledge Base] module. But that’s a topic for another time.
Tips from the Vibe Coding Process: Solutions to Several Issues
Issue 1: How to Upload Specific Images for Use in NoCode?
After exploration, I tried two solutions:
Solution 1: Visit image material websites, select an image, right-click to choose “Copy Image Link,” and send the link to AI, instructing it on how to use the image, such as: retain the portrait cutout, generate a transparent background, and place it to the right of the main title.
However, sites like Huaban have set up image hotlinking protections, making it impossible for NoCode to directly call them (or perhaps it is possible, but I didn’t have time to deeply research related prompts or technical means, nor did I want to provoke copyright disputes). Websites like Pixabay can provide commercially usable images, so you can try them, but still be cautious of copyright issues.
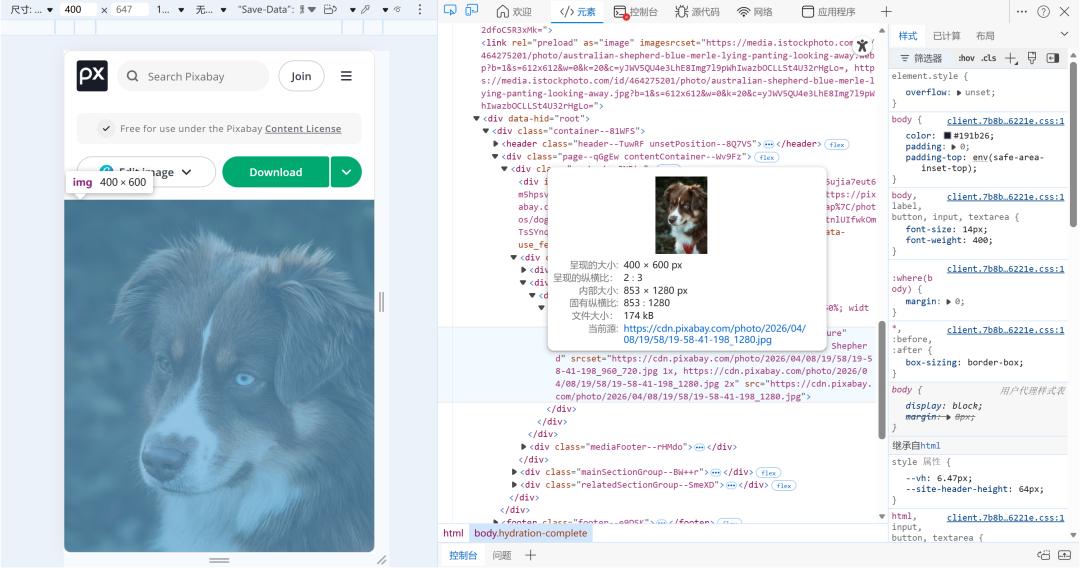
Additionally, if you find that the link obtained by right-clicking is still hard for AI to recognize, you can press F12 to enter “Element Inspection Mode,” click the far-left “Inspect” button, and hover over the image location to obtain a link that is easier for AI to recognize.
Solution 2: Use technical means to find free image hosting websites or purchase a server from Tencent Cloud, Alibaba Cloud, etc., upload images to your cloud server, obtain links, and send them to AI.
Issue 2: What if I Don’t Understand Design Software and AI-generated Images Look Ugly?
Recently, there was news about Google Stitch, claiming it can quickly generate UI. After a simple experience, I found it more suitable for designing products with simple logic and minimalist pages. If you want to use AI-generated products in complex scenarios like finance, its practicality may be lacking.
The previously popular lobster-type tools have also spawned a batch of design skills that I haven’t experienced yet.
Therefore, I suggest that when time is limited and you don’t aim for perfection, instead of spending time switching between large models to debug Stitch or carefully selecting and installing skills from GitHub, you might as well take screenshots of designs within copyright limits to provide as references for NoCode, asking it to generate UI in a similar style. Alternatively, you can work on the prompts to describe the desired design style more concretely. Ultimately, it comes down to improving your aesthetic judgment.
Issue 3: To What Extent Should AI-generated Tools Be Ready for Launch?
From my personal experience, even if you’ve never fully participated in internet product development, as long as you achieve two points while trying Vibe Coding, you can confidently share your product with everyone.
First, you have implemented the product functions you initially planned and achieved the desired results. Second, even if the aesthetics of version 1.0 are average, the front-end page can display information correctly.
Finally, I want to emphasize that the process I shared for creating tools with AI focuses on the front-end page; I have not considered the potential issues of “spaghetti code” that may arise after multiple rounds of prompt communication, nor have I delved into more complex issues like database design, code editor selection, or cloud server purchases.
I firmly believe that everyone has the right to experience the beauty of technology at a low cost. The AI Agents produced by large companies may deviate from the original intent of Vibe Coding, not demanding users to understand code, but emphasizing that “creativity is king.” For those of us with zero programming ability in front of the screen, leveraging human-computer interaction to enjoy the technological dividends, quickly launching a usable product, and receiving positive feedback that “I can do it too” is the essence of Vibe Coding.
In the end, what matters more is having a pair of observant eyes, a willingness to think of solutions, and the courage to practice despite difficulties. After all, technology is just a means; commercial monetization is still a distant starry sea. Only by using technology to benefit the hearts of ordinary people can we find the true meaning of Vibe Coding.
Comments
Discussion is powered by Giscus (GitHub Discussions). Add
repo,repoID,category, andcategoryIDunder[params.comments.giscus]inhugo.tomlusing the values from the Giscus setup tool.